

To remove a rear view mirror mount from a windshield, apply heat with a hairdryer and use a string to cut through the adhesive. Gently pry the mount off with a plastic wedge once the adhesive is loose.
Removing a rear view mirror mount may seem daunting, but it’s a task you can accomplish with some patience and the right tools. Tackling this process requires careful attention not to damage the windshield or the mirror mount. Whether you’re replacing a damaged mirror or upgrading to a new model, knowing how to properly detach the mount is essential.
This guide offers a step-by-step approach to ensure you can handle the job confidently. With a focus on safety and efficiency, you’ll find that a little bit of know-how goes a long way in DIY auto maintenance. Remember to work slowly and methodically to achieve the best results without causing any unnecessary damage.

Credit: www.youtube.com
Introduction To Rear View Mirror Removal
The rearview mirror is more than just a simple device to keep tabs on tailgaters—it’s an essential safety component of any vehicle, providing drivers with critical visibility of the road behind them. But, like any other part of a car, there might come a time when you need to remove the rearview mirror from its mount on the windshield. Whether you’re replacing a cracked windshield, upgrading to a high-tech mirror, or reattaching a mirror that has fallen off, understanding the proper removal technique is key to a smooth and damage-free process.
Understanding The Need For Removal
Before attempting to remove a rearview mirror, it’s important to identify the reason for removal. This can range from repairing a loose mount to installing an aftermarket accessory. By recognizing the need, you can adopt the appropriate method that ensures the integrity of both the mirror and the windshield is maintained. Neglecting to remove the mirror properly can lead to damage and potentially costly repairs.
- Repairing or replacing a damaged mirror
- Upgrading to a new model with advanced features
- Reattaching a mirror that has come loose over time
- Windshield replacement requiring the mirror to be temporarily removed
Types Of Rear View Mirror Mounts
There are various mounting systems used for attaching rearview mirrors to windshields, and each requires a different approach for removal.
| Type of Mount | Common Removal Method |
|---|---|
| Bracket Mounted (metal) | Often secured with a setscrew; requires an Allen wrench or screwdriver for removal. |
| Button Mounted (adhesive) | Heat and a specific adhesive solvent are frequently used to soften the glue for removal. |
| Spring-Loaded or Clip-On | Can normally be removed by hand with a careful push-slide motion. |
It’s essential to correctly identify the type of mount before proceeding with removal to avoid causing unnecessary harm to the rearview mirror assembly or the windshield.

Credit: www.youtube.com
Tools And Preparations
Removing a rear view mirror mount from the windshield is a task that requires precision and the right set of tools. Whether you’re replacing the mirror or simply need to reattach it properly, having the appropriate instruments at hand is crucial. Before you begin the process, it’s important to ensure you’re completely prepared. This section will guide you through the essential tools you need for the job and the safety measures to take to prevent any damage to your vehicle or yourself.
Listing Essential Tools for the JobListing Essential Tools For The Job
Proper tools are the key to a smooth and successful removal of your rear view mirror mount. Here is a list you should check off before you start:
- Adhesive remover: Ideal for weakening the bond between the mount and the windshield.
- Heat gun or hairdryer: Used for heating the adhesive for easier removal.
- Razor blade or putty knife: These aid in gently lifting the mount off the windshield.
- Gloves and eye protection: Essential for personal safety.
- String or dental floss: An alternate method for slicing through the adhesive.
- Microfiber cloth: For cleaning the windshield after removal.
- Adhesive cleaner: To remove any residual glue.
Safety Measures And Precautionary Steps
Taking safety precautions is not only important for protecting your vehicle but also for safeguarding yourself. Follow these steps:
- Wear gloves and safety goggles: These will protect your hands and eyes from sharp objects and harmful chemicals.
- Ensure the vehicle is parked in a shaded area or inside a garage as direct sunlight can affect the adhesive’s properties.
- Allow the vehicle to cool down if it has been in use. Hot windshields can complicate the removal process.
- Proceed with caution: Use the razor blade or putty knife with care to avoid scratching the glass and damaging the windshield.
Remember to work slowly and with patience. Applying too much force can lead to unnecessary breakage and may result in additional costs.
Step-by-step Removal Guide
Are you gearing up to tackle a seemingly daunting automotive task? Perhaps you need to replace a damaged rear view mirror or simply want to upgrade to a newer model with advanced features. Whatever the reason, removing the rear view mirror mount from the windshield is a critical first step. This Step-by-Step Removal Guide will equip you with the knowledge to deftly handle the job, whether you’re dealing with a screw-on or adhesive mount. Follow these instructions carefully to remove the mount efficiently and safely.
Identifying The Type Of Mount: Screw-on Vs Adhesive
Determining the type of mount holding your rear view mirror to the windshield is crucial before you proceed. Take a close look at the mount. Does it have screws, or does it seem glued on? If you see screws, it’s a screw-on mount. If not, you’re dealing with an adhesive mount. Identifying this is important because the removal process differs significantly depending on the mount type.
Procedures For Screw-on Mount Removal
For those with a screw-on mount, follow these steps:
- Begin by adjusting the mirror to get better access to the mount.
- Locate the set screw that secures the mirror to the mount. This is usually found at the bottom of the mount.
- Using the appropriate screwdriver, loosen the set screw. This will allow you to slide the mirror off the mount.
- Carefully detach the mirror from the mount and set it aside.
- If there’s a bracket attached to the windshield, remove any additional screws holding it in place.
- Once all screws are removed, gently take off the bracket from the windshield.
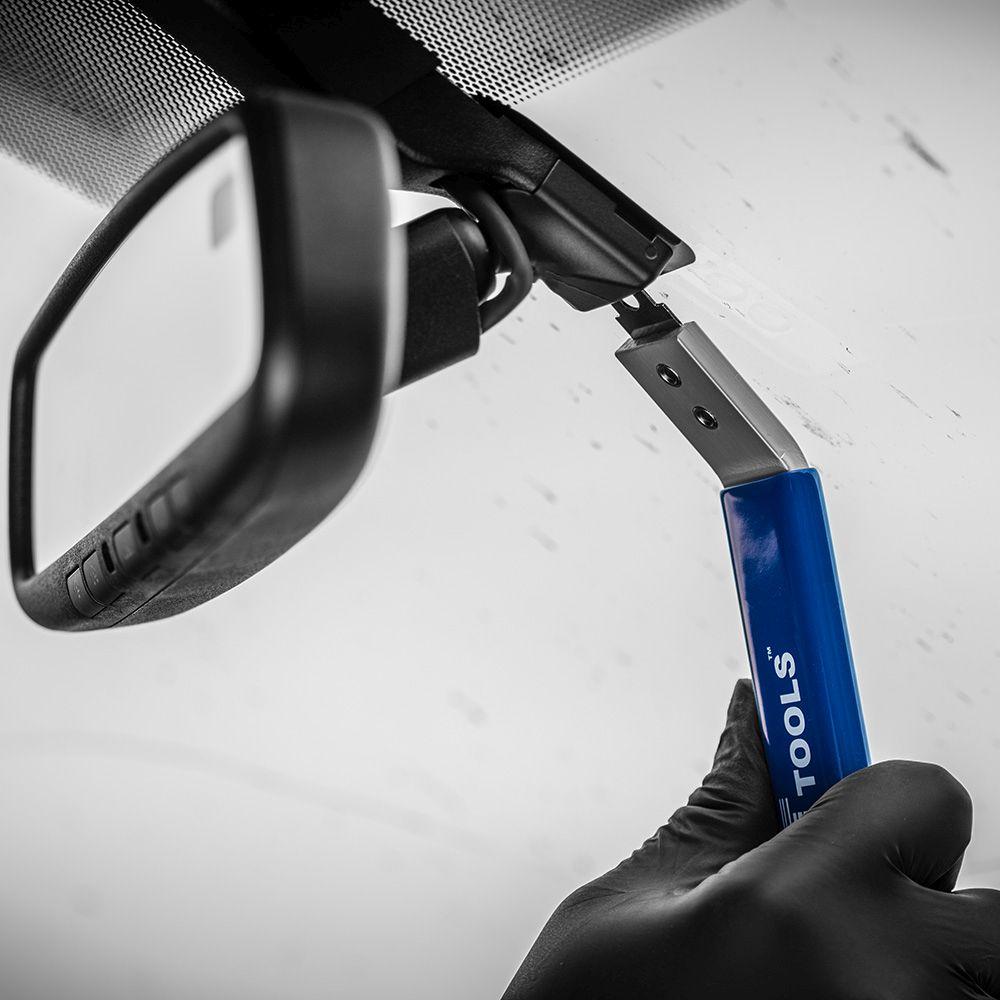
Techniques For Safely Removing Adhesive Mounts
For adhesive mounts, the approach is different. Here’s what to do:
- Prepare the area around the mount by cleaning any dirt or debris to avoid scratches.
- Apply heat gently to the mount using a hairdryer or heat gun to soften the adhesive. Be careful not to overheat the glass.
- Once the adhesive softens, use dental floss or a piece of fishing line to slice through the adhesive behind the mount.
- Slide the line back and forth in a sawing motion until the mount comes loose.
- Remove any residual adhesive from the windshield using a razor blade and glass cleaner. Take care not to scratch the glass.
With these detailed steps, removing your rear view mirror mount should be a breeze, regardless of the type. Remember, safety first; always handle tools and mirrors with care. Once the mount is off, you’re ready for the next phase of your rear view mirror project!
Dealing With Difficult Mounts
Encountering a stubborn rear view mirror mount when attempting to detach it from the windshield can be quite frustrating. Whether it’s due to aged adhesive, a stiff bracket, or simply a mount that seems fused to the glass, having the right approach can make all the difference. In this section, we focus on methods to overcome these challenges and safely remove that pesky mount.
Troubleshooting Common Problems
Mirrors that won’t budge often have common underlying issues. Identifying the specific problem is the first step towards resolution. Is the adhesive not giving way? Could there be a hidden screw or clamp? These are the types of questions to ask.
- Check for hidden fasteners: Occasionally, what seems like adhesive might actually be additional securing mechanisms. A thorough inspection can save time and effort.
- Assess the adhesive: Age and type of the adhesive used are key factors in how to approach the removal.
- Evaluate the mount’s material: Different materials, such as metal or plastic, may require distinct strategies.
How To Use Heat Or Chemicals To Loosen Stubborn Adhesives
Heat and chemical agents offer effective solutions for loosening adhesives that seem impenetrable. However, applying these methods requires care and precision to prevent damage to the windshield and surrounding areas.
Using Heat:
- Warm the mount gently with a heat gun or hair dryer from a distance, ensuring the glass doesn’t overheat.
- Apply the heat evenly in a circular motion, focusing on the edges of the mount.
- After several minutes, test the mount with gentle pressure to see if it has loosened.
- If necessary, apply more heat but avoid concentrating it in one area for too long.
Applying Chemical Agents:
- Select a proper adhesive remover that is safe for use on glass. Consult the product label for material compatibility.
- Apply the chemical agent to the edges of the mount and allow it to penetrate the adhesive.
- Wait the recommended time period mentioned on the product instructions.
- Begin to slowly work the mount loose with a plastic removal tool, avoiding metal objects that can scratch the glass.
Remember, patience is key. Give the heat or chemical time to soften the adhesive without rushing the process. Applying too much force can result in damage not only to the rear view mirror mount but also to the windshield itself.
Cleaning And Preparing The Windshield
Before embarking on the task of removing a rear view mirror mount from a windshield, it’s crucial to ensure the glass surface is impeccably clean and ready for the operation. Grime, adhesives, and residues can impede the removal process and compromise the integrity of the repair. The following steps will walk you through the best practices for creating a pristine surface, paving the way for a successful mount removal.
Removing Residue From The Windshield Surface
A spotless windshield surface is pivotal for avoiding snags during the mount removal process. The residue, primarily from adhesives, often clings stubbornly to the glass.
- Gather your tools: Arm yourself with a razor blade or a specialized adhesive remover tool to tackle the sticky remnants.
- Soften the residue: Apply an adhesive remover solution to the area and allow it to penetrate and loosen the grip of the hardened glue.
- Gently scrape: Once the adhesive has softened, use the blade or tool at an angle to carefully peel away the residue without scratching the glass.
- Wipe clean: With a microfiber cloth, remove any remaining adhesive remover solution and lifted residue, ensuring a clean surface remains.
Tips For A Clean And Streak-free Finish
Achieving a streak-free finish on your windshield is not just about aesthetic appeal; it’s about safety and precision as well. Here are tips to ensure transparency and readiness for the subsequent steps:
- Select the right cleaner: Opt for a high-quality glass cleaner formulated specifically for automotive glass to avoid streaks and smears.
- Use proper wipes: Microfiber cloths are excellent for glass cleaning; they’re gentle, absorbent, and leave no lint or residue behind.
- Circular motions: Apply the cleaner with circular motions, avoiding pooling and ensuring even application over the entire glass area.
- Buff to perfection: After cleaning, buff the windshield vigorously with a fresh, dry microfiber cloth to eliminate any potential streaking and achieve a diamond-clear finish.
Note: It’s best to clean the windshield in a shaded area or garage to prevent the cleaner from drying too quickly under direct sunlight, which can contribute to streaking.
Credit: www.gtglass.com
Reinstallation Or Replacement
Successfully removing your rear view mirror mount from the windshield brings you to the pivotal point of either reinstallation or replacement. Whether opting for an upgrade due to damage or for enhanced features, selecting the right rear view mirror and securely attaching it is crucial for safe driving practices. This section delves into the key considerations for choosing a suitable new rear view mirror and the precise steps to follow for mounting it, alongside imperative precautions to bear in mind throughout the process.
Choosing A New Rear View Mirror
Selecting the appropriate rear view mirror requires a balance of functionality, compatibility, and personal preference. Start by confirming the mirror’s compatibility with your vehicle’s make and model. Next, consider features such as auto-dimming, built-in compasses, or advanced driver assistance systems if your vehicle supports them. It’s essential to check attachment type—some use a simple adhesive, while others may require a more intricate mounting bracket. Ensure the new mirror fits within your budget while meeting all safety and aesthetic requirements.
Mounting A New Mirror: Steps And Precautions
Mounting a new rear view mirror is a procedure that demands attention to detail and due diligence. Here is an itemized list of steps and precautions to guide you through the installation process:
- Preparation: Clean the windshield area where the new mount will be adhered. Use an alcohol pad to remove any residue for a strong bond.
- Adhesive Application: Apply the recommended adhesive to the mount, not the windshield. Refer to the instructions for the correct amount.
- Alignment: Carefully position the mount on the windshield. Keep it level and at the appropriate height, avoiding any obstructions to the driver’s view.
- Pressure Application: Press the mount firmly onto the windshield for the time specified by the adhesive manufacturer, ensuring a secure attachment.
- Curing Time: Allow the adhesive to cure. This could take several hours to a full day depending on the product used.
- Final Steps: Once the adhesive is fully cured, attach the rear view mirror to the newly installed mount. Confirm it is secure before driving.
During the entire process, wear safety gloves to protect your hands and ensure the room is well-ventilated if using strong adhesives. Avoid touching the adhesive with bare hands and do not attach the mirror until the mount has fully bonded to prevent any movement that could weaken the hold.
Frequently Asked Questions Of How To Remove Rear View Mirror Mount From Windshield
How To Remove Rear View Mirror Mounting Button From Windshield?
To remove a rear view mirror mounting button, heat it with a hair dryer, then gently pry it off with a razor blade. Wear gloves for safety and protect the windshield to avoid damage.
How Do You Remove Rear View Mirror Adhesive?
Begin by warming the adhesive with a hair dryer to soften it. Then, use a razor blade to carefully pry and scrape off the residue. Finish by wiping the area with a cloth dampened with adhesive remover or rubbing alcohol.
How Do You Remove A Rear View Mirror Glass?
Begin by tilting the mirror to access its mounting clips. Press down on them gently to release the glass. Slide the glass up and out carefully to remove it from the housing. Always handle with care to avoid breakage or injury.
Does Safelite Reattach Rear View Mirror?
Yes, Safelite offers rear view mirror reattachment as part of their auto glass repair services. Contact them directly for assistance.
Conclusion
Removing a rear view mirror mount can seem daunting at first. By following the steps outlined, you can accomplish this task with confidence. Remember to have patience and the right tools at your disposal. Tackling this project ensures your windshield remains clear and your visibility, optimal.
For future automotive DIY advice, keep our blog bookmarked!


