

To adjust a brake booster rod, first, locate the rod behind the brake pedal, then fine-tune the length to ensure proper engagement. Turn the rod clockwise or counterclockwise as needed to either shorten or lengthen it.
Adjusting the brake booster rod is a key maintenance step that ensures the optimal performance of your vehicle’s braking system. It involves calibrating the push rod that connects the brake pedal to the master cylinder, which is essential for proper brake pedal feel and function.
Proper adjustment can prevent issues such as a spongy brake pedal or excessive pedal travel. Mechanics and experienced DIYers know that this adjustment can markedly improve driving safety and overall vehicle handling. Vehicles with power brakes need regular checks on the brake booster rod to maintain the correct brake pedal height and pressure sensitivity. Always use the vehicle’s manual for guidance and adhere to safety standards while performing this task to avoid any complications.

Credit: m.youtube.com
Introduction To Brake Boosters
Brake boosters are essential components in modern braking systems, designed to amplify the driver’s pedal force when applying the brakes. Ensuring that the brake booster rod is properly adjusted is crucial for maintaining optimal braking performance and vehicle safety. An incorrectly adjusted booster rod can lead to a soft pedal feel or excessive pedal travel, compromising the responsiveness of your brake system.
For a brake system to function correctly, it is imperative that the brake booster rod is precisely calibrated to engage the master cylinder with the correct amount of pressure. This will not only provide a confident pedal feel but also ensure consistent braking effectiveness across various driving conditions. Properly adjusting the rod can prevent potential brake system issues and maintain reliability on the road.
Tools And Preparation
Preparing your workspace and gathering the right tools is crucial for adjusting a brake booster rod safely and effectively. Ensure that you have a brake pedal depressor or a suitable alternative to keep the pedal down while working. A set of wrenches and socket set are indispensable for loosening and tightening nuts. Keep a rule or measuring tape handy for accurate adjustments.
Prior to commencing, perform a safety inspection on your work area to verify that it is clean and free of any potential hazards. Inspecting the brake booster and rod for damage or wear before making adjustments is also crucial. This ensures that you are working with components that are in good condition, which is essential for maintaining vehicle safety and brake efficiency.
| Tool | Function |
| Brake pedal depressor | Holds brake pedal in place |
| Wrenches/Socket set | Adjusts nuts and fasteners |
| Measuring tape | Ensures precise rod adjustments |
Step-by-step Guide To Adjusting The Brake Booster Rod
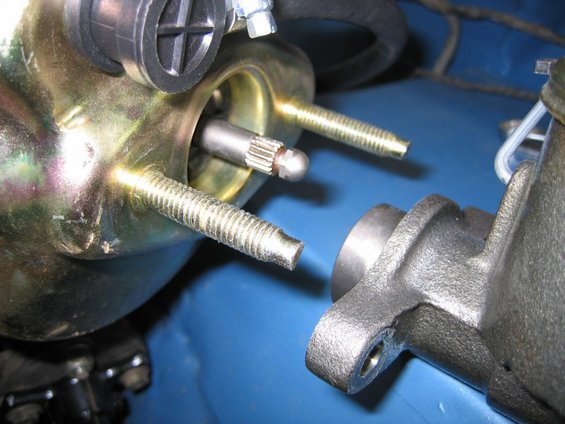
Proper brake function is crucial for vehicle safety, and the adjustment of the brake booster rod is a key component of this. Before starting the adjustment, the brake booster must be located, typically found at the driver’s side of the firewall. The rod connects the booster to the brake pedal.
Measuring the rod length is next, which involves measuring from the center of the booster to the end of the rod where it attaches to the pedal. This initial measurement is essential for comparison after adjustments.
| Adjustment Type | Action |
|---|---|
| Increasing Rod Length | Turn the rod counterclockwise to extend its length. |
| Decreasing Rod Length | Rotate the rod clockwise to shorten it. |
After alterations, it’s imperative to check the brake pedal feel. A correct adjustment will result in a pedal that’s neither too soft nor too hard. Additionally, re-measure the rod to ensure the new length is accurate and within the recommended specifications provided by the vehicle manufacturer.
Troubleshooting Common Problems
Dealing with a sticking brake pedal is a common issue that requires prompt attention. It is crucial to ensure the brake booster rod is properly adjusted. A pedal that fails to return to its default position could signify an obstruction or misalignment in the rod linkage.
Resolving insufficient braking power often involves inspecting the vacuum hose for leaks. A proper seal and hose integrity are paramount for optimal booster performance. Additionally, verifying that the booster rod is engaging the master cylinder without excessive free play is essential.
For correcting overly sensitive brakes, it is necessary to adjust the brake booster rod length. Fine-tuning this rod ensures that the braking response is neither too aggressive nor too lax, striking a balance for safe driving conditions. The adjustment requires careful turns of the rod end, testing brake response after each adjustment.
Maintaining Brake Booster Efficiency
Maintaining optimal performance of your vehicle’s brake system is pivotal. Regular inspections should occur at least once every six months. During these checks, ensure the brake booster rod is properly adjusted. A maladjusted booster rod can lead to increased stopping distances or a spongy brake pedal. It’s crucial to verify the master cylinder is securely fastened and the booster rod’s length meets the manufacturer’s specifications.
Determining the right time to seek expert advice can save you from future complications. Unusual brake pedal behavior, such as excessive travel or difficulty engaging, often indicates the need for a professional assessment. DIY adjustments can be risky if you lack experience. Trusting a certified mechanic ensures safety and adherence to vehicular standards.
Investing in the longevity of your brake system involves preventative care. Regularly check the brake fluid levels and look out for leaks. Use only the recommended fluid type and replace it according to the service interval specified by your vehicle’s manufacturer. Consistent attention to these details aids in preventing costly repairs and maintaining a reliable brake system.

Credit: forum.ih8mud.com
Credit: www.fullsizebronco.com
Frequently Asked Questions For How To Adjust Brake Booster Rod
How Do You Adjust The Brake Booster Rod?
To adjust the brake booster rod, first locate it behind the brake master cylinder. Turn the rod clockwise or counterclockwise to lengthen or shorten it, securing proper pedal height and free play. Always double-check the adjustment according to the vehicle’s service manual.
How Do You Adjust A Pushrod Master Cylinder?
To adjust a pushrod in a master cylinder, first ensure the system is depressurized. Loosen the locknut, then turn the pushrod with a wrench. Adjust until you achieve the desired pedal free play, then retighten the locknut to secure the setting.
Always double-check the pedal feel before driving.
Why Is There Too Much Free Play In My Brake Pedal?
Excessive brake pedal free play often results from worn brake pads, stretched cables, or low brake fluid. Regular maintenance checks can prevent this issue.
How Much Vacuum Does A Brake Booster Need?
A brake booster typically requires between 17 and 21 inches of vacuum for optimal performance.
Conclusion
Adjusting your brake booster rod is crucial for safe driving. With the steps outlined, anyone can achieve well-balanced brakes. Regular checks keep your vehicle at peak performance. Remember, if you’re unsure, consult a professional. Safe driving starts with well-maintained brakes – ensure yours are in top shape.


