

To change a tag light, locate the screws holding the covers against your vehicle above the license plate near the trunk latch. Use a screwdriver to turn them counterclockwise and then pull the covers off to expose the light bulbs underneath them.
You can also watch tutorial videos on YouTube for a step-by-step guide on how to change license plate lights.
Understanding Tag Lights
Tag lights are an essential part of any vehicle’s lighting system. These lights are typically located above the license plate and serve the purpose of illuminating the plate for visibility and compliance with traffic laws. The importance of tag lights cannot be overstated, as having a properly functioning and bright tag light ensures that your license plate is easily readable, especially during nighttime or low-light conditions. There are different types of tag lights available, including LED lights, halogen bulbs, and incandescent bulbs. LED lights are becoming increasingly popular due to their energy efficiency and long lifespan. When it comes to changing tag lights, the process is relatively simple. Look for the lights above your license plate near the latch that opens your trunk, locate the screws holding the covers against your vehicle, and use a screwdriver to turn them counterclockwise. Once the screws are loose, pull the covers off to expose the light bulbs underneath them. Unscrew the old bulbs and replace them with the new ones, making sure they are securely in place. Overall, changing tag lights is a straightforward task that can be easily done to ensure proper illumination of your license plate.
Credit: www.yourmechanic.com
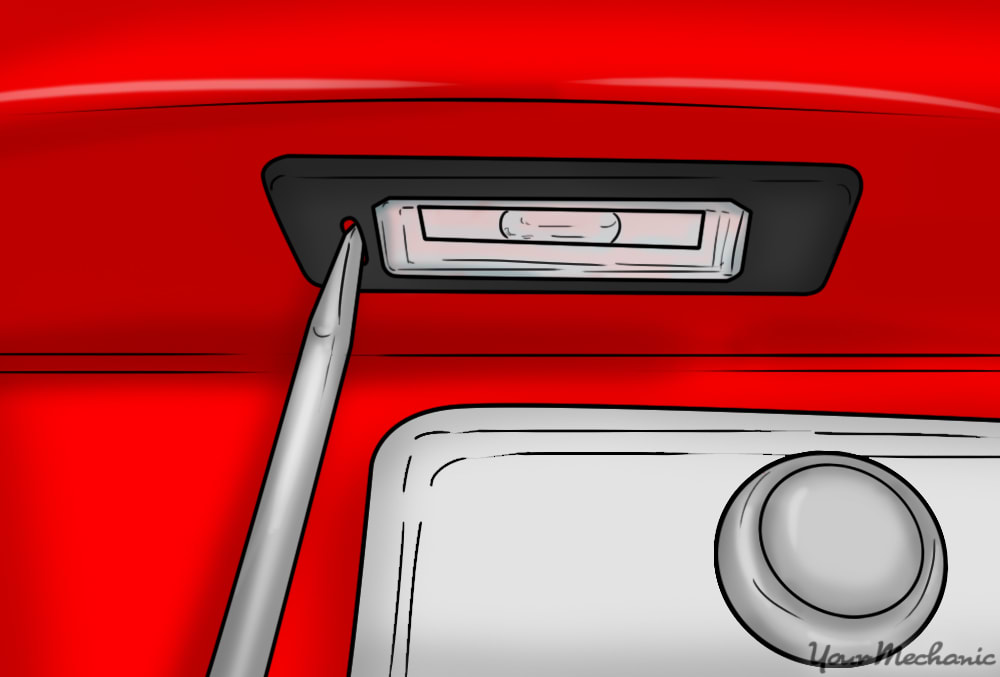
How To Change Tag Lights
Locating the tag lights is the first step in changing them. Look for the lights above your license plate near the latch that opens your trunk. Once you have located the lights, you can proceed to remove the tag light covers. To do this, locate the screws holding the covers against your vehicle and use a screwdriver to turn them counterclockwise. Once the screws are loose, carefully pull the covers off to expose the light bulbs underneath.
With the tag light covers removed, you can now replace the tag light bulbs. Simply remove the old bulbs by gently pulling them out of their sockets. Then, insert the new bulbs into the sockets, making sure they are securely in place. Finally, replace the tag light covers by aligning them with the screw holes and tightening the screws clockwise.
Tips And Tricks For Changing Tag Lights
Changing tag lights may seem like a daunting task, but with the right information, it can be a straightforward process. Here are some tips and tricks to help you:
Choosing the right replacement bulbs: Before starting the replacement process, make sure to find the correct replacement bulbs for your specific vehicle model. Consult your vehicle’s manual or do some research online to ensure you have the right bulbs.
Preventing damage during the replacement process: To avoid any damage to your vehicle, use a screwdriver to carefully loosen the screws holding the covers of the tag lights. Once the covers are off, you can easily access the light bulbs underneath without causing any harm to your vehicle.
Testing the new tag lights: After installing the new tag lights, it’s essential to test them to ensure they are working correctly. Turn on your vehicle’s lights and check if the new bulbs are emitting the desired amount of light. If not, double-check the installation and make any necessary adjustments.

Credit: www.wikihow.com

Credit: www.youtube.com
Frequently Asked Questions For How To Change Tag Light
How Do You Remove A License Plate Light Bulb?
To remove a license plate light bulb, locate the lights above your license plate near the trunk latch. Use a screwdriver to turn the screws counterclockwise and remove the covers. Then, the light bulbs will be exposed.
How Do I Change My Plate Number Light?
To change your plate number light, locate the screws on the covers above your license plate and turn them counterclockwise with a screwdriver. Once loose, remove the covers to access the light bulbs underneath them. Pull out the old bulbs and replace them with new ones.
How Do You Install A License Plate Light?
To install a license plate light, follow these steps:1. Locate the lights above your license plate near the trunk latch. 2. Find the screws holding the covers and turn them counterclockwise with a screwdriver. 3. Once the screws are loose, pull off the covers to expose the light bulbs underneath.
4. Replace the old bulbs with new ones. 5. Put the covers back on and tighten the screws. – This process is also shown in tutorial videos on YouTube for visual guidance.
What Can I Use For A Tag Light?
To change a tag light, locate the screws holding the covers above your license plate and turn them counterclockwise to loosen. Remove the covers to expose the light bulbs. Replace with new bulbs and secure the covers back in place.
Conclusion
To change your tag light, start by locating the screws holding the covers above your license plate. Use a screwdriver to turn them counterclockwise and remove the covers, revealing the light bulbs underneath. Unscrew the license plate and bracket to access the light easier.
Lever out the license plate lamp with a screwdriver or in some cases, unscrew it. Once done, replace the old light bulb with a new one and reassemble everything. Simple steps to ensure your tag light is functioning properly!


